
Showing posts with label Handouts-Tutorials. Show all posts
Showing posts with label Handouts-Tutorials. Show all posts
May 22, 2011

A Great Free Math Resource for You

Whether you want to make sure you're ready for our final next week, or any test for years to come, Math Made Easy is a great site to learn various topics at your own pace. Since we will be having fractions, decimals, and percents on our final, you may want to check this site out, pronto. Give it a look, bookmark it, and return when you need some extra help.
.
.
May 20, 2011
How to Copy, Cut, and Paste for Beginners
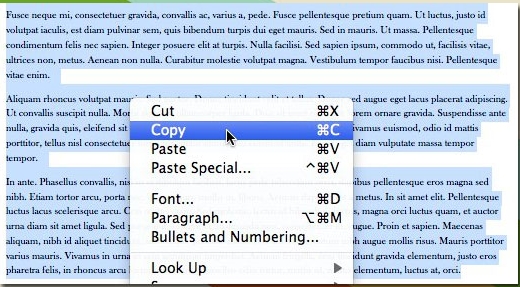
It's such a simple operation, you'd think everyone already knows how to copy, cut, and paste. But since I've been asked a few times how to do this, here is a quick beginners guide.
First, What's the difference between copy/paste and cut/paste?
When you copy/paste, whatever you are copying stays where it is. After you paste it, you now have that text or that picture in two places: Where you copied from and where you copied to.
When you cut/paste, the part you are cutting is removed from its place and moved to the place you are pasting it to. You don't have two copies of it like you do with copy/paste.
So, how do you cut or copy and paste?
First, select the item you want to copy or cut:
- If it's a file in a folder that you want to copy (to duplicate) or cut (to move) into another folder, click on the file to select it. To select multiple files at once, hold down the Control (CTRL) key (on Windows) while clicking the other files.
- For images, right-click on the image, then click on "Copy" or "Copy Image" depending on the application.
- If you want to copy some text, highlight it by clicking just before the first letter you want to copy, hold down the mouse button while dragging your mouse to the right, and then releasing after you have selected your text.

Copying/Cutting and Pasting: The Point-and-Click Method
Next, in many applications, you'll see at the top of the application window, "Edit" right next to "File". Click Edit to reveal the drop down menu and select Copy or Cut, depending on what you want to do and if cutting is an option.
Okay, now that we've selected the item and copied/cut it into memory, we can paste it somewhere else. In your new document or folder, go back to Edit and select Paste. Alternately, if you don't have that Edit menu (e.g., in Windows Explorer), right-click in the document or folder and select Paste.
A Faster Method: Keyboard Shortcuts
Copying, cutting and pasting with your mouse is pretty straightforward, but using keyboard shortcuts can save you a lot of time.
Select your items to copy or cut as above. To select all items on a page or folder, you can use the CTRL+A or Command + A shortcut: hold down the CTRL button (on Windows) or Command key (on Mac) then hit the A key.
Then hit these keys together to copy, cut, and paste them:
Windows: Hold down the CTRL key then click
- C to copy
or - X to cut
- V to paste
That's all there is to it. Practice a few times, and you'll be able to do it without even thinking.
.
.
May 5, 2011
Test Prep: Stem & Leaf Samples
Try working these problems before checking the answer. It will go fast and you'll be better prepared for tomorrow.
First, draw the stem and leaf for the following data: 30, 43, 25, 18, 8, 14, 37
Before plotting the data on the stem and leaf, arrange the data from least to greatest.
After putting the data in the stem and leaf, find the mean of the data.
Then find the median.
Finally, find the mode.
Stem & Leaf Sample 2:
For this example, you only have to place the data in the stem & leaf. Here's the data:
117, 109, 123, 85, 102, 127, 215, 136
After doing the problems, the answers can be found here.
Don't forget to check the previous post for sample mean, median, and mode questions.
Good Luck, see you tomorrow.
P.S. I'm still working on the Super Teaser, give it a day or two at most.
First, draw the stem and leaf for the following data: 30, 43, 25, 18, 8, 14, 37
Before plotting the data on the stem and leaf, arrange the data from least to greatest.
After putting the data in the stem and leaf, find the mean of the data.
Then find the median.
Finally, find the mode.
Stem & Leaf Sample 2:
For this example, you only have to place the data in the stem & leaf. Here's the data:
117, 109, 123, 85, 102, 127, 215, 136
After doing the problems, the answers can be found here.
Don't forget to check the previous post for sample mean, median, and mode questions.
Good Luck, see you tomorrow.
P.S. I'm still working on the Super Teaser, give it a day or two at most.
.
.
.
Test Prep: Mean, Median & Mode
Here's a quick review for tomorrow's test. Try to work the problems before checking the answer.
Mean: First, Sum all of the data, then divide by the number of items in your data. For example: You are asked to find the mean of 6,10,5,7,6,8,. Try working the problem now. Add up the numbers and then divide by 6, the number of data points. Go ahead, work it, I'll wait.
Here is the answer:
Sum = 42, divided by 6 = mean of 7 Press and highlight the blank area before the sentence to view answer.
Median: When finding the median, you must first place the numbers in order from least to greatest or greatest to least. Using the same numbers above, they are rewritten 5, 6, 6, 7, 8, 10. The median is the number in the middle. If you have an even number of data items, like we do here, add the two middle numbers and divide by 2. Go ahead, find the median..
6 + 7 = 13 /2 = 6.5 Once again, highlight the area before this sentence for the answer: Did you get it correct?
Mode: The mode is simply the number that appears most often, the most common number. For our numbers, 5, 6, 6, 7, 8, 10, the mode is, what? Did you get 6 for the mode? Hope so.
Check back a little later tonight for Stem & Leaf examples, gotta go walk the dog now.
.
.
.
Apr 26, 2011
Step-By-Step Guide to Rotations
There are three types of rotations, so you need to remember three rules. We will do one example here. A rotation problem might be something like this:


Graph the image of the figure after a rotation of 90°clockwise:

Step 1: Write the coordinates of the given figure. The coordinates are: M(1,0), N(3,2), O(4,-1) P(3,-3)
Step 2: Use the rule for rotating 90 degrees clockwise. Check the bottom of Page 508 for this. (I'll wait.....)
The rule is, switch the coordinates, then change the sign of the second number.
Step 3: Write down the new coordinates. The new coordinates are: M(0,-1), N(2,-3), O(-1,-4) P(-3,-3)
Step 4: Plot the new coordinates and draw the new figure. Like this:
You still need to know the rules for counterclockwise and 180 degrees.
Step 5: the..the..the..that's all folks. Study.
.
.
.
Step-By-Step Guide to Reflections
There are two types of Reflections, so there are two rules you need to remember. A reflection problem might say something like:
The vertices of figure JKLM are J(-4,-2), K(-2,-2), L (-1,-4), M (-5,-4). Graph the figure and its image after a reflection over the Y-axis.
Step 1: Plot the coordinate points and connect the dots, like this:
 Step 2: Since we are reflecting over the Y axis, we need to know the rule for this. (Checking page 508, top)...Here it is: The Y coordinate stays the same, and we change the sign on the X coordinate. The new coordinates are:
J(4, -2), K(2,-2), L(1,-4), M(5,-4)
Step 3: Plot the new coordinates, and draw the new figure. Like this:
 For a reflection over the X axis, check the top of page 508 and know that rule, too.
Step 4: Go to the next problem
.
The vertices of figure JKLM are J(-4,-2), K(-2,-2), L (-1,-4), M (-5,-4). Graph the figure and its image after a reflection over the Y-axis.
Step 1: Plot the coordinate points and connect the dots, like this:
J(4, -2), K(2,-2), L(1,-4), M(5,-4)
Step 3: Plot the new coordinates, and draw the new figure. Like this:
Step 4: Go to the next problem
.
.
Step-By-Step Guide to Translations
When you translate a figure, you simply move it to another part of the graph. A translation problem might say something like,
Triangle RST is shown on the coordinate plane. Find the coordinates and graph the image if triangle RST is translated (-6,-3). Here is triangle RST:

Step 1: You must write down the coordinates of triangle RST.
The coordinates are: R (3,3) S (4,1) T (2,-2)
Step 2:Move each point 6 units left (-6), & 3 units down (-3).
The new coordinates are: R (-3,0) S (-2,-2) T (-4,-5)
Step 3: Plot the new points, and draw the new figure. Like this:
 Step 4: Go to the next problem
Triangle RST is shown on the coordinate plane. Find the coordinates and graph the image if triangle RST is translated (-6,-3). Here is triangle RST:

Step 1: You must write down the coordinates of triangle RST.
The coordinates are: R (3,3) S (4,1) T (2,-2)
Step 2:Move each point 6 units left (-6), & 3 units down (-3).
The new coordinates are: R (-3,0) S (-2,-2) T (-4,-5)
Step 3: Plot the new points, and draw the new figure. Like this:
.
.
.
Apr 16, 2011
Trouble with Transformations? Here's Help
If you're having trouble figuring out the whole transformation thing, you know, translations, reflections, and rotations, help is on the way.
Two short animated videos can be downloaded here and here.


Two short animated videos can be downloaded here and here.

Another video for those who need to start at the very beginning can be downloaded here. This video covers x and y coordinates, how to plot them on a graph, and what positive and negative coordinates are.
I have also created a few short Power Point presentations covering all the different topics involved. They can be downloaded here, here, and here,

There is one last Power Point with 3 problems to solve and the answers so you can check yourself. I encourage you to try those three, as we will be testing on this the week we return to school. The download for this Power Point is here.
More to come during the week. So what??? Only Kai knows how to create, save, and send a short video?? Really?? You're all so rich and full that you don't need $10 from Subway. C'mon, someone give it a shot!
.
.
.
Apr 3, 2011
3rd Qtr. Final Review Pt. 2
Be sure and download both of the final review parts and bring them on your laptop Monday. The second part can be found here, and should download to your downloads folder. Once again, let me know if these work with Open Office. There are a couple of things we can do to fix it if you cannot view the PowerPoints.
Of course, you can always get started early, since you will be solving all the problems on both of the presentations. Good Luck.

Of course, you can always get started early, since you will be solving all the problems on both of the presentations. Good Luck.
Apr 2, 2011
PowerPoint Tutorials/Review for Final Exam
If you need more practice or are confused about some of the topics we covered this quarter, then please download, view, and practice the examples in the following PowerPoint presentations. As mentioned in the previous post, you should be able to view them with Open Office. See the post before this for directions and the final exam review for download. Here's the downloads:
For Circles: Click Here
For Triangles, Polygons, and Area, click here, here, and here
Finally, for Proportions and Similar Shapes, click here
This should keep you busy for awhile. Put some time in before the final and you'll do much better.
.
.
.
For Circles: Click Here
For Triangles, Polygons, and Area, click here, here, and here
Finally, for Proportions and Similar Shapes, click here
This should keep you busy for awhile. Put some time in before the final and you'll do much better.
.
.
.
3rd Quarter Review for Download
As mentioned before, your review guide for this quarter's final exam is a PowerPoint presentation. Although the answers are given, you will still have to work out all the problems. If you do not get the right answer, work it again until you do. I will be checking your work to make sure the answer was achieved correctly. Here is the link for the Presentation. It should download directly to your download folder.

NOTE: Even though OpenOffice does not automatically open this type of file, you should be able to open and then go to slide show, from beginning.
If you are having trouble opening the file, please email me and let me know.
.
.
.
NOTE: Even though OpenOffice does not automatically open this type of file, you should be able to open and then go to slide show, from beginning.
If you are having trouble opening the file, please email me and let me know.
.
.
.
Mar 30, 2011
Re Posting Circles; Videos & Handouts
This is a repost from March 24th. I encourage everyone to view the videos--multiple times. Practice the examples with the tutor. Also, I encourage everyone to download the handouts and work on them while the informattion from the video is fresh. More videos and a 3rd quarter final exam review guide to come soon.
After our test on Tuesday, we will begin a unit on circles. This unit includes finding the radius, diameter, circumference and area of a circle. There are two videos which will help you understand these topics.
Instead of putting the videos in this post, the links will allow you to download the videos to your hard drive so you can view them at anytime even if you do not have internet access.
1. Circles: Radius, Circumference, & Diameter
2. Circles: Area of a Circle
Also, our first two handouts are available here and here. They will download automatically.
Please let me know if any of the links do not work
.
.
After our test on Tuesday, we will begin a unit on circles. This unit includes finding the radius, diameter, circumference and area of a circle. There are two videos which will help you understand these topics.
Instead of putting the videos in this post, the links will allow you to download the videos to your hard drive so you can view them at anytime even if you do not have internet access.
1. Circles: Radius, Circumference, & Diameter
2. Circles: Area of a Circle
Also, our first two handouts are available here and here. They will download automatically.
Please let me know if any of the links do not work
.
.
Mar 28, 2011
Links to Earlier Posts
Here's some quick links to help you find your way around the site.
For Avast! Antivirus, and the media players VLC and KLM, click here.
For the Browsers Firefox and Google Chrome, and the background changer Oceanis, click here.
To get a Gmail account, click here. To see some of the features and things you can do with a Gmail account, click here.
To get Xtra Credit on Tomorrow's Test, click here.
For video tutorials and the handouts you'll need on our next unit, click here.
For different Websites you may be interested in, click here and here.
For other categories and items on this site, check the 'Page' lists on the right side of the page, or scroll down and see each post individually.
 Test Tomorrow!!!!
.
.
.
.
.
.
.
For Avast! Antivirus, and the media players VLC and KLM, click here.
For the Browsers Firefox and Google Chrome, and the background changer Oceanis, click here.
To get a Gmail account, click here. To see some of the features and things you can do with a Gmail account, click here.
To get Xtra Credit on Tomorrow's Test, click here.
For video tutorials and the handouts you'll need on our next unit, click here.
For different Websites you may be interested in, click here and here.
For other categories and items on this site, check the 'Page' lists on the right side of the page, or scroll down and see each post individually.
.
.
.
.
.
.
.
Mar 24, 2011
Math Tutorials & Handouts to Download
After our test on Tuesday, we will begin a unit on circles. This unit includes finding the radius, diameter, circumference and area of a circle. There are two videos which will help you understand these topics.
Instead of putting the videos in this post, the links will allow you to download the videos to your hard drive so you can view them at anytime even if you do not have internet access.
1. Circles: Radius, Circumference, & Diameter
2. Circles: Area of a Circle
Also, our first two handouts are available here and here.
Please let me know if any of the links do not work
Instead of putting the videos in this post, the links will allow you to download the videos to your hard drive so you can view them at anytime even if you do not have internet access.
1. Circles: Radius, Circumference, & Diameter
2. Circles: Area of a Circle
Also, our first two handouts are available here and here.
Please let me know if any of the links do not work
Test Review Document for Download
If you want to get started reviewing for Tuesday's Test, you can download the document here. It is saved as a PDF document so everyone should be able to open it.
Mar 19, 2011
Math Video: Indirect Measurement

Mar 17, 2011
Watch & Learn: Similar Triangles
It would be a great idea to take 9 minutes out of your life to watch this video on similar triangles. We will be covering this topic for the next week or so.
Mar 11, 2011
Subscribe to:
Posts (Atom)


